My Lovely Followers

Thursday 31 December 2015

Make A Wish

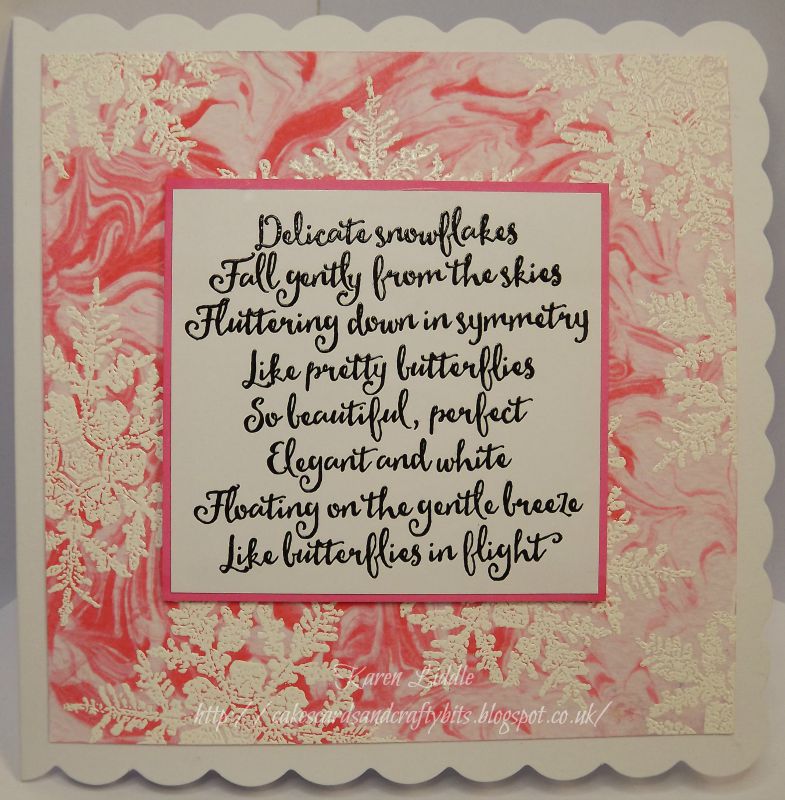
I've been rooting through my file of backgrounds I've made over the last few months and thought I really need to start to use them.  This is the first one.
For this one, I spritzed a piece of cardstock with water, then scrunched it all up until I was happy with all the wrinkles and creases.  Once it was dry, I spritzed the cardstock with various ink sprays, sorry I don't have the colours but they're a mix of Cosmic Shimmers and Dylusions.  Once I had the effect I wanted I dried it off with the heat gun then spritzed again, but with just plain water with a bit of mica powder added, to give it a pearly sheen.  Once it was all dry, I ironed it as flat as possible, then stamped the dandelion fluffies (that's what my kids called them when they were little and still do.... lol) with Black Versafine, then heat embossed them with clear embossing powder.  The fluffies and sentiment are all from the same set of stamps from Inkylicious.
I'd like to enter this into the present challenge at That's Crafty (8.1.16)
Thanks for looking and Happy New Year!!!

Wednesday 30 December 2015

A Bit Masculine

I've had this stamp set for ages and it's never been used, so thought I'd use it for this mans card. (we all know how difficult they are to make..... lol)
I started off by blending distress ink for the background, Rusty Hinge, Tea Dye and Aged Mahogany.  I then did some random stamping with a script stamp from a Tim Holtz set, and the various small stamps from the main set, sorry I have no idea what make the stamp set is, I think it was free on a magazine.  I then stamped the main image and sentiment in black Versafine and heat embossed with clear embossing powder.  I also did the edges the same.
I have no one in mind for this card, but it will come in handy at some point.
I'd like to enter this into the present challenge over at That's Crafty, where their theme is 'Anything Goes'. (8.1.16)

Monday 28 December 2015

First Christmas card for 2016!

This is my first Christmas card for next year...... can't beat starting early...... lol.  Ok, I'll admit, I make them all year round.
I started with a 'shaving foam' background which I'd done a while ago.  I added hills with Stormy Sky distress ink, and added the stamping using stamps from Lavinia of course.  Finished off with some sparkle.  The sentiment was computer generated and then foiled.
I'd like to enter this into the present challenges at Lavinia Stamps (31.12.15)
and That's Crafty (8.1.16)

Tuesday 22 December 2015

Long time no post!

I didn't realise how long it was since I last posted, been that busy with Christmas cards and other Christmas stuff.......   I have a couple of birthdays in the next week, so I've finally got round to making them.
I used Distress ink in Tumbled Glass and Tea Dye for all the colour on this one.  The sentiment is a stamp by Woodware, the others, of course are Crazy Birds.
I used the bubble stencil from Clairty, inked through with Adirondack Inks in Pink Sherbet and Egg Plant.  All of the stamps are from a set by Marion Emberson called On Your Special Day.

Sunday 22 November 2015

Inkylicious Christmas

I bought this stamps at the beginning of October and this is the first time I've stamped with it and actually added it to a card.  I got the inspiration from a card by Martine Smith on a facebook group I'm in.  Martines card was a bigger than this one, I made it to fit a 6 inch square card base.
The stamps is from Inkylicious and is called Winter Lodge.  I made little slopes by masking and inking against the mask, coloured the image with Promarkers.  The icicles were cut with a die from Marianne Dies, the snowflakes were Spellbinders dies.  I finished of with some glamour dust for the sparkle.
Thanks for looking 
xxx

Christmas Cards

It's a couple of weeks since I last posted, I've been busy decorating, so haven't really had time of felt like making cards.  I've made a couple of Christmas cards and this is one of them.  I saw this style on my friend Kathy's blog, and thought I'd give it a go.
I used a sponge to drag some colour along the bottom of the card, Distress Ink - Peacock Feathers, then inked through a stencil in the same colour.  I then stamps some snowflakes with Versafine Smokey Gray and finished off with a sentiment from JustRite stamps and some gems.

Tuesday 3 November 2015

Crazy Bird Christmas

Don't you just love the Crazy Birds!  This one doesn't look happy at all does he...... lol.
I stamped the had and the bird first on water colour card, then cut them with the matching dies.  I then used Distress Inks to colour him in.  The branch and cones were cut with Marianne dies and the background was ran through an embossing folder with Distress Ink added with a blending tool.  It doesn't show on the picture, but I also rubbed Gilding Wax all over the embossing, the sentiment was cut with dies by Tim Holtz.
Thanks for looking
I'd like to enter this into the present challenge at Papertake Weekly where the theme is Anything Goes.

Sunday 25 October 2015

Halloween

I'm still loving these Halloween stamps from Chocolate Baroque....... lol.  I used Distress Inks in Peeled Paint, Dusty Concord, Vintage Photo and Spiced Marmade for this tag.
I'm entering this tag into the present challenge at That's Crafty, where the theme is Halloween.
Thanks for looking.
xxx

Tuesday 20 October 2015

Glitter & Gems

I've been playing with Aquatints, and came up with this background, completely by accident.  I wasn't happy with how I did it at first, so though well before I put it in the bin, I'd have a play around with it.  So all I did was splash more Aquatints and water to it, and this was the result, love the marble effect that happened.  The stamp is from Lavinia Stamps, which I stamped with black Versafine, then heat embossed with Crystal Print Magic ( from DMD), the photo doesn't show the sparkle though, anyway I added gems to it, cut the icicles with a Marianne die, snowflake with a Spellbinders die and added glitter to them.  The sentiment was cut with Tim Holtz dies.
I'd like to enter this into the present challenges at - 
Lavinia - Glitter & Gems.
World Wide Open - Anything Goes
Thanks for looking.
xx

Sunday 18 October 2015

Dreams.......

I have some inspiration using stamps by Visible Image today.
I stamped and heat embossed with white embossing powder, both corners.  The I used Brushos to add the colour, I used Orange and Scarlet.  I also coloured the stamped butterflies with the same colours, just adding as water colours, which I then cut out, added some pearls for the bodies and attached to the card just down the bodies, so that the wings give that added dimension.  I also stamped and heat embossed the sentiment.

Stamps used for this card are -
Revolution (scroll)
Butterfly
Where Dreams Take You

Wednesday 14 October 2015

IndogBlu

I entered a challenge over on IndigoBlu's challenge blog a few weeks ago, and was asked to make an inspiration piece for them for today, with the theme of Autumn Days.

This is what I came up with.
As usual I used Distress Inks applied with blending brushes (shaving brushes.... lol), in the following shades, Forest Moss, Spiced Marmalade, Ripe Persimmon, Fossilized Amber and Vintage Photo.  The stamps are of course by IndigoBlu, called Nature Set 1.
Thanks for looking.
xxx

Sunday 11 October 2015

Think Pink!

As October is Breast Cancer Awareness month, I have some pink inspiration for you today.  As many of my regular visitors will know, I lost my lovely sister in law (more like a sister) Lynn to this terrible decease 4 years ago, after a 6 year battle and many, many operations and treatments.  You can read my tribute to Lynn HERE.  The sentiment is very fitting for the kind of person Lynn was.
I made the background with 3 shades of inks, Distress Inks in Picked Raspberry and Worn Lipstick, and Adirondack Ink in Shell Pink.  I then over stamped with various different background stamps (all listed below).  I then stamped the Butterflies on a piece of card and coloured using the same inks as the background, then cut them out and glued them to the piece leaving the wings loose so they stand up adding dimension.  To finish off I stamped the sentiment and added it to the card along with some silver card candy.

Stamps used are -

Here's the links for everything Visible Image.
Visible Image Website - Buy stamps, get lots of inspiration, newsletter sign up, and contact details.
Visible Image Blog - Daily inspiration from the DT.
Visible Image Facebook Group - DT inspiration, monthly 'Show & Tell' contest, and the place to find lots of other Visible Image fans.
Visible Image Facebook Page - Where you'll find all the latest news and information.

Saturday 10 October 2015

Halloween Tag

I'm entering this tag into the present challenge over at Fantasy Stampers where the theme is 'Fright Night'.


I coloured the background again with 2 Distress Inks, Dusty Concord and Chipped Sapphire and Spiced Marmalade for the pumpkin, and a promarker for the toadstools.  All stamps are from Chocolate Baroque.

Thanks for looking xx

Halloween Tags

I don't send Halloween cards, but I do like Halloween, so thought I'd make some tags.
 I used 2 Distress Inks for the background, Dusty Concord and Peeled Paint, which I also used to colour Crazy Bird along with Black Soot and Spiced Marmalade.  All other stamps are from Chocolate Baroque.  I now have the dies to match the Crazy Bird stamps which makes things so much easier when you want them cut out..... lol.

I'm entering this tag into the present challenge over at Fantasy Stampers where the theme is 'Fright Night'.

Thanks for looking!
xx

Tuesday 6 October 2015

Little Things......

Well my blogging everyday didn't do very well...... lol things never go to plan do they......
Anyway, this is a little tag I made last week.  I used Distress Inks in Mermaid Lagoon and Everygreen Bough for the background, applied with duster brushes.  The flower and bubble stamps are from a set by Paper Artsy, birds, sentiment and harlequin patters are from a Tim Holtz set. I added highlights with a white Posca pen.
Thanks for looking!
xxx

Sunday 4 October 2015

Brushos & Visible Image

Time again for some inspiration using stamps from the fab Visible Image.
First I stamps the Poinsettias then used Brushos to add the colours.  Starting with the flowers, I took a paintbrush and painted the flowers, with water, then sprinkled just a tiny amount of the red Brusho and spread it around a little to fill in all the petals, I did this for each flower.  Then I painted water onto the background, and again sprinkled the Brushos, letting the colour spread as normal, but using the paintbrush to help the colour spread.  I finished off with gold gems in the flower centres and a sentiment.
Stamps used for this one are:

Here's the links for everything Visible Image.
Visible Image Website - Buy stamps, get lots of inspiration, newsletter sign up, and contact details.
Visible Image Blog - Daily inspiration from the DT.
Visible Image Facebook Group - DT inspiration, monthly 'Show & Tell' contest, and the place to find lots of other Visible Image fans.
Visible Image Facebook Page - Where you'll find all the latest news and information.

Monday 28 September 2015

Daisy Duck

I made this card for my Great niece who was 2 last week.  I used Distress Inks in Spun Sugar and Shaded Lilac for the background.  I stamped and coloured the image with ProMarkers and used the Letterbox stamps from Clarity for the wording, to which I also added a coat of very fine sparkly embossing powder.  The little flowers were a stamp from The Stamp Man with a gem added to the centres.
Thanks for looking xx

Sunday 27 September 2015

Dreams......

It's that time again...... time for some Visible Image inspiration.
The background was created with Distress Inks, and over stamps with stamps from Visible Image.  Sorry, but I forgot to make a note of the colours I used :/ The sentiment was heat embossed with gold embossing powder.
Stamps used are:

Here's the links for everything Visible Image.
Visible Image Website - Buy stamps, get lots of inspiration, newsletter sign up, and contact details.
Visible Image Blog - Daily inspiration from the DT.
Visible Image Facebook Group - DT inspiration, monthly 'Show & Tell' contest, and the place to find lots of other Visible Image fans.
Visible Image Facebook Page - Where you'll find all the latest news and information.

Wednesday 23 September 2015

Babywipes..........

Yesterday I went browsing the net for ideas for something a bit different (well for me anyway....lol) and came across a technique I've not done for a long time and had forgotten about - Distress Ink Refills and Babywipes.
This is the result.
I simply dripped 3 different colours of  reinkers onto the babywipe, which would become my ink pad.  The colours I used are Squeezed Lemonade, Evergreen Bough and Worn Lipstick.  I then used stamps from Bee Crafty - Maple Solid and Maple Outline, first stamping with the solid stamp, then over stamping with the outline, using Versafine.  The sentiment is a stamp from Sentimentally Yours.
Thanks for looking
xXx

Tuesday 22 September 2015

Clarity Challenge

I just came across the Clarity Stamp challenge blog the other day, where the theme is 'Shaped Cards', so I thought I'd enter it with this card.
I used 2 Distress Inks to colour the background - Dusty Concord and Mowed Lawn, I then inked through a bubble stencil to create the Bokeh effect.  All stamps and the stencil are by Clarity Stamps.

Sunday 20 September 2015

Delicate Snowflakes

Time for my weekly inspiration using stamps from Visible Image.
I created the swirly background using the shaving foam technique, such a fun thing to do!  I then over stamped that with the snowflake stamps and heat embossed using white embossing powder, then Stamped and mounted the sentiment.
Stamps used for this card are -

Here's the links for everything Visible Image.
Visible Image Website - Buy stamps, get lots of inspiration, newsletter sign up, and contact details.
Visible Image Blog - Daily inspiration from the DT.
Visible Image Facebook Group - DT inspiration, monthly 'Show & Tell' contest, and the place to find lots of other Visible Image fans.
Visible Image Facebook Page - Where you'll find all the latest news and information.

Thursday 17 September 2015

Sunny Tag

I thought I'd do a tag for a change for today's inspiration.
I got this stamp from Inkylicious a few months ago and never got round to inking it up, along with the other 3 I got at the same time.........  I really love the sentiment that comes with the treescape stamp, the birds are from a different stamp set from Inkylicious.  I started by cutting out the tag with a Tim Holtz die, then inked it up using brushes with the following Distress Inks - Forest Moss, Spiced Marmalade, Squeezed Lemonade, Peeled Paint and Dried Marigold.
Thanks for looking!#
xXx

Wednesday 16 September 2015

Brusho Card

To start this card I stamped onto water colour card with Versamark, using a stamp from Visible Image, and heat embossed with white embossing powder, this creates a resist against the Brushos.  Then out came the Brushos..... only 2 colours - Emerald and Cobalt Blue.  I added tiny amounts, one colour at a time, to dry card, then spritzed with water.  I stamped the sentiment, also from Visible Image, and added some gems to the flower centres.

Tuesday 15 September 2015

Orange Christmas....hmmmm

Well this ink is Sepia, not Orange!....... lol.  The tree stamps are from Visible Image, and the sentiment from JustRite (my favourites).  I added little bits of white to the trees with a Posca pen, splattered white acrylic paint over the whole piece to look like falling snow, and finished of with a bit of glitter on the trees and snow banks.

Monday 14 September 2015

A Bit of MDF

This is a practice run for a future MDF project.  I knew what I had in mind but wanted a trial run before I did it on the main project, and I'm pleased with out it turned out.  I gave the plaque a couple of coats of white Gesso, then once that was dry, I too 2 shades of acrylic paint and applied them with a dry brush.  The then stamped the snowflakes, which is an Indigoblu stamp, with Versamark and heat embossed with white embossing power and finished off with some die cut snowflakes with some added sparkle.
Hopefully my main project will appear in a week or so.......lol
Thanks for looking xx

Sunday 13 September 2015

Feeling Festive with Visible Image

I have a couple of Christmas cards to show you today, both using only stamps from Visible Image.
I love to create moon/sun scapes.  I masked of the moon and used Black Soot DI, applied with a brush to create the sky, making it slightly lighter at the bottom.  I removed the mask and added the trees, stamped in Adirondack Oregano, I stamped the sleigh with Versafine Onyx Black.  I finished off with sentiment heat embossed in silver.
Stamps used for this card are -
For this one I did the Josephs Coat Technique. 
Stamps used for this one are -

And here's all the links you need for everything Visible Image -

Visible Image Website - Buy stamps, get lots of inspiration, newsletter sign up, and contact details.
Visible Image Blog - Daily inspiration from the DT.
Visible Image Facebook Group - DT inspiration, monthly 'Show & Tell' contest, and the place to find lots of other Visible Image fans.
Visible Image Facebook Page - Where you'll find all the latest news and information.

Saturday 12 September 2015

Well......

.......my posting everyday didn't get of to such a good start did it...... lol.  I only came down with a tooth infection which really knocked me off my feet, I even phoned in sick for work, which is something I never do.  It's eased of a bit now and I feel a bit more normal, whatever normal is..... lol, so I thought I'd try again with my blogging every day.  Oh by the way the problem tooth is coming out on Wednesday!
Anyway, I felt like making a couple of cards yesterday, so here's one of them.  I got the idea from Pinterest.
I bought these stamps a couple of years ago and never used them, so I went looking for ideas and came across something similar to this.  This was a nice quick card and I covered it with crystal print magic, which is a very fine clear embossing powder with a bit of added sparkle, it really does make the images pop!
The Pine Cone is a stamp from Hero Arts and the branch from Impression Obsession, which I bought on a trip to Florida.
Back tomorrow with my DT cards for Visible Image.

Sunday 6 September 2015

Lavinia Stamps & Bokeh

It's a while since I've entered the challenge over on Lavinia Stamps, so thought I've enter this month.  Their challenge theme is 'Hot Bright Colours'.
I used Distress Inks in the following colours for the background, Abandoned Coral, Mustard Seed and Picked Raspberry.  All stamps are of course from Lavinia.

Visible Image DT

Sunday means I have a couple of cards to show you using stamps from the fab Visible Image.
I inked through a Memory Box Stencil, then heat embossed the sentiment stamp in silver.  This made a nice quick card.  The stamp is called 'Magic of Christmas' and is available for you to buy HERE.
Another nice quick and easy card.  I used watered down acrylic paint, simply brushed across the centre of the card.  I then over stamped with a sentiment from the 'Be Happy Set', and then used a stamp from the 'Inksplats' set, randomly around the card and heat embossed with a vintage Frantage powder.

And here's all the links you need for everything Visible Image -

Visible Image Website - Buy stamps, get lots of inspiration, newsletter sign up, and contact details.
Visible Image Blog - Daily inspiration from the DT.
Visible Image Facebook Group - DT inspiration, monthly 'Show & Tell' contest, and the place to find lots of other Visible Image fans.
Visible Image Facebook Page - Where you'll find all the latest news and information.

Friday 4 September 2015

This Time Last Year............

........ I was in New York with hubby, celebrating our 30th Wedding Anniversary, I can't wait to go again, hopefully next year. 
 Here's a few photos from our visit.
 Macy's, a great place for your handbags...... lol
 View from the Empire State Building - Spectacular!
 WTC Freedom Tower 
WTC Memorial Pools - A very emotional place 
 Lady Liberty, isn't she fab!
The Flat Iron Building, beautiful!

Thursday 3 September 2015

Sunset....

I haven't added this to a card yet.  I love creating scenes, I did this one over the weekend when I felt like my mojo had gone.  I wanted to do something but didn't know what, so off I went to You Tube and came across a tutorial, so thought I'd play along.  I just wanted to do something I didn't really want to have to think too much about...... lol.
The colours I used for the background are Sail Boat Blue, Butterscotch and Raspberry, all Adirondack ink pads.  The twiggy stamps is the Winter Tree stamp from Visible Image and the others are from Inkylicious. 

Wednesday 2 September 2015

IndigoBlu

I'm trying to be more up to date with my blog and post something every day, let's see how it goes eh.... lol.
I've made this card for the challenge over at IndigoBlu where the theme is 'Frame It'.  I inked the background first with Dusty Concord Distress Ink, masking of the moon.  Just 2 stamps used for this one which are from the 'Here Comes Santa' set.  I also added some glitter to the snowflakes but it's not showing too good in the photo.

Tuesday 1 September 2015

Leafy Vines

This card is actually purple..... looks like brown on the pic...... lol.  I used the fab Leafy Vines stamps from Hero Arts, heat embossed in Silver.  The sentiment is computer generated and then cut with Sue Wilson dies.

Monday 31 August 2015

Bright Lights of NYC!

 I used Aquatints for the background on this card, sprinkled onto wet water colour card.  I also splashed some plain water over the top and dabbed off to reveal lighter speckles.  Then I stamped over with a stamp from Altenew.  The set is called 'Sketchy Cities America'.  I think this stamp works well with this background, the bright lights of New York! (yes I'm still in love with NYC)

Sunday 30 August 2015

Going Green with Visible Image

I've just realised I've got 2 green cards this week.........duhhhh
I used Aquatints to colour the background, just one colour brushed over wet, water colour card.  I did a couple of brushes across either side, leaving the middle pretty clear, the inks blended nicely in the middle.  I used a stencil for the tiny dots then used Ink Splats stamps around the edges, heat embossed Flower Inkognito and the sentiment stamp is Imperfection is Beauty.
I made my own stencil for this one, just a square nestie cut through mylar.  I then inked through it with Diestress Ink, and stamped the snowflakes in the same colour.  I heat embossed the sentiment.  Only one stamp set was used which was White Christmas.

And here's all the links you need for everything Visible Image -

Visible Image Website - Buy stamps, get lots of inspiration, newsletter sign up, and contact details.
Visible Image Blog - Daily inspiration from the DT.
Visible Image Facebook Group - DT inspiration, monthly 'Show & Tell' contest, and the place to find lots of other Visible Image fans.
Visible Image Facebook Page - Where you'll find all the latest news and information.

Tuesday 25 August 2015

Anniversary card

I made this card for my neice for her 2nd Wedding Anniversary, then forgot to blog it!  This is using a stencil from Clarity Stamps, which I inked through with Distress Ink Abandoned Coral, 
 the couple, is one of the Wee Folk stamps, from Clairty.  I cut a corner of a background stamp for the hearts, as I don't have any tiny heart stamps, hard to believe with the hundreds of stamps I own..... lol.

Christmas with Clarity

I love these Wee Folk stamps from Clarity Stamps.  I've made a few of these cards, just in different colours.  I think they're quite cute!
I made my own masks, just the right size to cover these cards, nice easy cards.


Sunday 23 August 2015

Visible Image

I used Distress Inks for the background, blended with sponges.  Colours used are Dusty Concord, Mustard Seed and Picked Raspberry.  I also splashed drops of water over the ink and dabbed off, this removes the colour and creates white spots, love doing this.
 Stamps used are - Bronte Script and White Christmas.
The background for this one was made by 'smooshing' the card through Evergreen Bough Distress Ink, on my craft mat.  I then splashed drops of water over the ink and dabbed of with tissue, leaving white spots.  I love the pattern created with the inks.  Stamps used are Vision Inkognito, Never Grow Up Set.

And here's all the links you need for everything Visible Image -

Visible Image Website - Buy stamps, get lots of inspiration, newsletter sign up, and contact details.
Visible Image Blog - Daily inspiration from the DT.
Visible Image Facebook Group - DT inspiration, monthly 'Show & Tell' contest, and the place to find lots of other Visible Image fans.
Visible Image Facebook Page - Where you'll find all the latest news and information.

Wednesday 19 August 2015

Easy stuff....

I've been a bit stuck on what to do this last couple of days, so off I went Googling....... came across a few things which were quite straight forward and didn't need much thought...... lol.  So out came my Distress and Adirondack ink pads and away I went.
 I blended 3 colours of Distress Inks for this one, Peacock Feathers, Picked Raspberry and Fossilized Amber and used brushes to apply the ink.  The birdie stamp is from Inkylicious, and the Happy Birthday a stamp I've had for years.
2 colours of Adirondacks were used for this one, Stonewashed and Lettuce, again applied with brushes.  The stamp is also from Inkylicious and I coloured the red flowers with a Promarker.